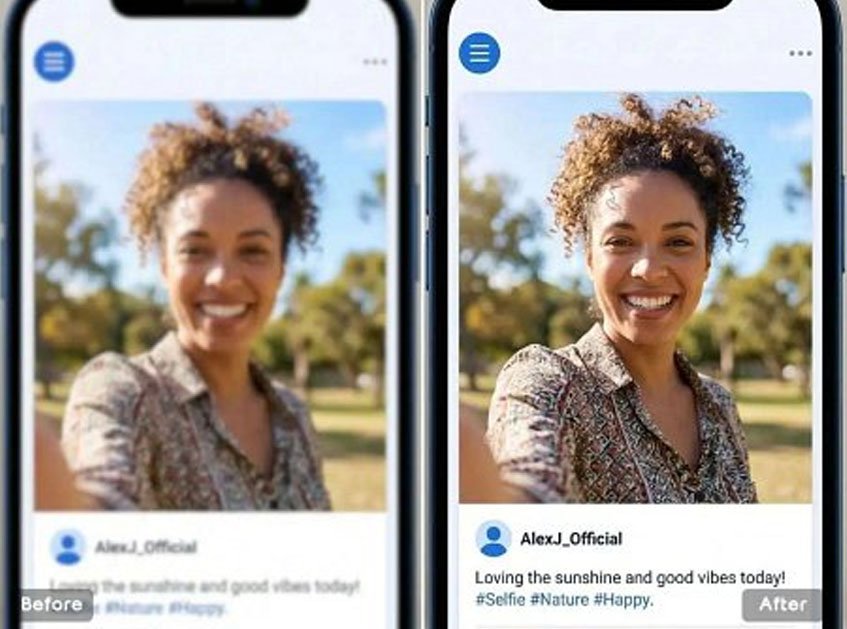
Image quality problems show up everywhere. A photo may look fine on a phone screen, then turn soft and blurry on a website banner. A product image might be usable for a marketplace listing, but too small for a blog post or ad creative. An old photo may have emotional value, yet not enough detail to print clearly or share professionally. In all of these cases, AI image upscaling can help.
Modern AI tools do more than stretch an image to a larger size. They analyze patterns, edges, textures, and facial features, then rebuild missing detail so the bigger version looks sharper and more natural. That makes AI upscaling useful for creators, ecommerce teams, designers, marketers, students, and anyone who needs to improve image quality without learning advanced editing software.
If you need a quick way to enlarge visuals while restoring clarity, an AI tool to upscale image files can be a very practical starting point.
If you also want a broader browser-based workflow for touching up the final result, a free ai image editor can help with cleanup, lighting, and finishing adjustments after upscaling.
This guide explains how AI image upscaling works, when to use it, what kinds of images respond best, and how to improve the final output without making it look artificial.
What AI image upscaling actually does
Traditional resizing simply increases the number of pixels in an image. That makes the file larger, but it does not add meaningful visual detail. The result is often a bigger version of the same blur, especially around edges, skin, text, or product outlines.
AI upscaling works differently. Instead of just enlarging the image, it predicts what higher-resolution detail should look like based on the content of the photo. It can sharpen boundaries, refine textures, improve local contrast, and make the image feel more defined than a standard resize.
That is why AI upscaling is often paired with image enhancement. The goal is not only to make an image bigger, but also to make it more usable at that larger size.
When AI upscaling is most useful
AI upscaling helps most when the image is limited by size rather than completely ruined by quality. If a photo is small but reasonably clear, AI can often recover a stronger high-resolution version. If an image is extremely blurred, badly compressed, or motion-smeared, the tool may improve it, but the result will still have limits.
Here are some common situations where AI upscaling works well:
| Use case | Why upscaling helps | Typical goal |
| Product photos | Makes small images more usable for listings and banners | Cleaner ecommerce visuals |
| Blog and content images | Improves clarity for headers and featured graphics | Better on-page presentation |
| Social media assets | Helps visuals stay sharp across crops and exports | Stronger publishing quality |
| Old photos | Restores some clarity before sharing or printing | Better preservation and viewing |
| Design mockups | Enlarges reference images for presentations | Cleaner client-facing materials |
The best results usually come from images that already have a clear subject, decent lighting, and visible structure. AI can work wonders on a small file, but it still benefits from a good starting point.
Why AI enhancement matters after upscaling
Upscaling and enhancement are related, but they are not exactly the same thing. Upscaling focuses on enlarging the image and rebuilding missing detail. Enhancement focuses on improving how the image looks overall through sharpening, contrast, brightness, texture cleanup, and similar corrections.
This matters because a larger image is not automatically a better image. Sometimes the upscaled version is bigger but still slightly dull, flat, or uneven. A quick enhancement pass afterward can make the result look more polished and natural.
A simple AI upscaling workflow
If you want reliable results, it helps to follow a clear sequence instead of applying random edits. A simple workflow keeps the image from becoming oversharpened or overprocessed.
| Step | What to do | Why it matters |
| Start with the best source file | Use the cleanest available version | Better input improves detail recovery |
| Upscale first | Increase size before making cosmetic edits | Preserves a cleaner enhancement workflow |
| Check the enlarged image closely | Look for strange textures or halo effects | Helps catch AI artifacts early |
| Enhance only what needs improvement | Adjust sharpness, light, or noise carefully | Keeps the image natural |
| Export for the real use case | Review it where it will actually appear | Prevents surprises after publishing |
Step 1: Choose the best source image you can find
The quality of the original file still matters. If you have multiple versions of the same image, use the one with the highest resolution and the fewest compression artifacts. Even a modest improvement in source quality can make the AI result look much cleaner.
Avoid screenshots or heavily compressed copies when possible. Those files often contain edge distortion, color banding, and digital noise that become more obvious when the image is enlarged.
Step 2: Upscale the image before making other edits
It is usually better to enlarge the image first and then improve it. If you apply strong sharpening, retouching, or heavy color effects before upscaling, those changes may get exaggerated when the file grows larger.
Starting with upscaling gives you a cleaner foundation. Once the image reaches the size you need, you can judge what kind of enhancement is still necessary.
Step 3: Inspect the result at close range
AI upscaling can create impressive improvements, but it is not magic. Some images come back with slightly unnatural hair texture, overly crisp outlines, or small invented details that do not quite fit the scene. These issues are easier to catch when you zoom in rather than checking only the full-image preview.
Pay close attention to areas like faces, text, product edges, repeated patterns, and smooth gradients. These are the places where upscaling tools tend to reveal their strengths or weaknesses most clearly.
Step 4: Enhance the image with restraint
After upscaling, you may want to improve the image further. Common next steps include mild sharpening, brightness correction, contrast balancing, noise cleanup, and small color adjustments. These changes can make the upscaled version feel more finished, especially if the original image was dim or soft.
The important word here is mild. Too much sharpening can create halos. Too much contrast can make shadows harsh. Too much smoothing can remove the realism you just worked to recover. A moderate pass almost always looks better than an aggressive one.
Step 5: Review the image in its final context
An image that looks slightly soft at full resolution may look excellent in a blog header. A tiny artifact on a background texture may not matter at all in a product thumbnail. That is why it helps to preview the image where it will actually be used instead of judging it only inside the editor.
This final check also helps you decide if you need another pass. In some cases, the first upscaled version is already enough. In others, a small cleanup edit after export will make the image feel much more complete.
Best image types for AI upscaling
Some types of images respond especially well to AI enlargement and enhancement:
| Image type | Why it works well | Watch out for |
| Product photos | Clear edges and simple backgrounds are easier to rebuild | Reflections and glossy surfaces |
| Portraits | Faces benefit from detail recovery when the source is decent | Over-smoothing skin or eyes |
| Landscapes | Textures such as trees, buildings, and skies can gain clarity | Repeated patterns looking artificial |
| Digital graphics | Clean shapes and lines scale well | Text edges may still need checking |
| Old personal photos | AI can improve shareability and print readiness | Severe blur or damage limits recovery |
Knowing which images are good candidates helps set realistic expectations. AI is strongest when it enhances what is already there, not when it has to invent an entire image from almost nothing.
Common mistakes to avoid
One of the most common mistakes is using a very poor source file and expecting a perfect result. AI can improve many images, but it cannot fully replace missing information when the original is extremely low quality.
Another mistake is confusing size with quality. A larger file can still look bad if the enhancement is too heavy or the underlying image is weak. Always judge the final visual result, not just the pixel dimensions.
People also tend to over-process the image after upscaling. They sharpen too much, boost clarity too far, or smooth away natural texture. That usually makes the final picture look artificial instead of improved.
How to get better-looking upscaled images
If you want more natural results, keep your workflow focused:
- Start with the cleanest source image available.
- Upscale before applying heavy edits.
- Inspect important details such as faces, text, and edges.
- Use moderate enhancement instead of maximum effects.
- Review the image where it will actually be published or printed.
This process works because it keeps the tool focused on improving the image, not overpowering it.
Why AI upscaling is useful for everyday work
You do not need to be a designer to benefit from AI upscaling. Online sellers can improve product photos. Bloggers can sharpen post headers. Social media managers can prepare assets for multiple dimensions. Students can make presentation visuals clearer. Families can restore older snapshots enough to share and print more comfortably.
That range of use cases is why browser-based AI tools have become so popular. They solve a practical problem quickly, and they do it without forcing users into a complicated editing workflow.
A practical example workflow
If you want a straightforward routine, use this:
- Upload the original image to an AI upscaler.
- Generate the enlarged version.
- Zoom in and inspect edges, facial detail, textures, and text.
- Apply light enhancement only where needed.
- Export the image at the size that matches your final use.
That sequence is simple, repeatable, and effective for most web and content tasks.
Final thoughts
AI upscaling makes it much easier to turn small, soft, or aging images into cleaner assets for publishing, sharing, and design work. The biggest advantage is not just size. It is the ability to enlarge an image while rebuilding enough detail to make that larger version more useful.
The best results come from realistic expectations and a restrained workflow. Start with the best source you have, upscale first, enhance carefully, and review the result in context. When you follow that process, AI can make image quality improvement feel fast, approachable, and surprisingly effective.