Are you aware that it is possible to shorten the time spent in the dryer and preserve your clothes in a better condition by carrying out dryer vent cleaning Markham? The lint and dust can get inside the appliance and vent system through daily use and consequently make the appliance less efficient and even cause a fire hazard.
Adhering to an adequate maintenance plan – or even booking dryer vent cleaning around Markham services – can assist you in sustaining performance and safety.
- Do Dryers Need to Be Cleaned?
Regular dryer cleaning provides several advantages, and they may be in enhancing the appearance or in ensuring the highest functioning of the dryer. Various components of your dryer (e.g. the lint trap, drum, and vent) need to be cleaned at different intervals.
If it continues to accumulate even after cleaning, it may be time to look into dryer vent cleaning in the Markham area or even replacing the vent system.
- What Do You Do to Clean the Inside of a Dryer?
To clean the inside of your dryer, you will need to remove lint and residue in the lint trap, drum, and vent system. Prepare the required materials and equipment before commencing to ensure it runs smoothly.
- Supplies
- Microfiber cloth.
- Spray of water and vinegar.
- Detergent.
- Nylon brush.
- Tools
- Dryer cleaning brush.
- Vacuum with hose (optional).
- Screwdriver.
In a case where the process appears to be lengthy, professional dryer vent cleaning Markham services will be able to complete such steps more effectively and efficiently.
Step 1: Take Lint Out of The Lint Trap
A lint trap that is clean enhances the efficiency of the dryers and airflow. To clean it:
- Take out the lint screen and place it aside.
- Wipe inside and outside of the lint tab with an interior vacuum crevice tool or brush.
- Wipe the moisture sensor strips around the trap.
- Install the lint screen.
Regular services at this level will minimize the frequency of the dryer vent cleaning around Markham interventions.
Step 2: Turn Off and Unplug Dryer
Safety is essential. It is important to never leave the dryer on its power connection when it is being cleaned. In the case of gas dryers, close the valve of gas supply and disconnect the line.
Step 3: Clean Up Dryer Drum.
In the long run, dryer sheets and detergents cause residue to be left in the drum. Start with vacuuming up of loose debris. In the case of electric dryers, use a cloth moistened in warm soapy water and wipe the drum. In the case of gas dryers, a non-flammable cleaner must be used.
Complete with wiping using a damp cloth and a short drying cycle to dry it.
Step 4: Pull Out the Dryer to Access Vent Duct
Relocate the dryer to allow room to clean the vent duct. Always be careful not to injure or damage the appliance by having someone with you.
One of the steps involved in effective maintenance is accessing the vent, particularly in preparing more profound dryer vent cleaning around Markham.
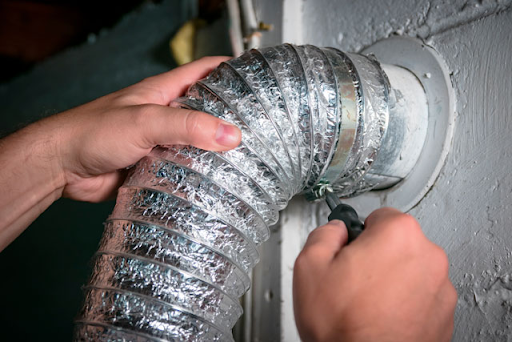
Step 5: Take Off Clamps and Disconnect Vent
Unscrew clamps or remove tape to detach the vent at the back of the dryer. A screwdriver may be required for this step.
Removal will be done with care so that you can clean the duct properly, without damaging it, whether you do it yourself or contract cleaning dryer vent near you services.
Step 6: Wipe The Vent
Use a vent cleaning brush to loosen up any debris that has been left behind, then remove big pieces of lint with your fingers. Clean up with vacuum hose to remove dust in crevices.
This is one of the most important steps to avoid the airflow impediments. When the accumulation is pronounced, it is better to book the services of dryer vent cleaning Markham professionals and have a more comprehensive task.
Step 7: Clean And Investigate Exterior Vent
Locate the exterior vent, usually found on an outside wall or roof. Unscrew the cover and take out any lint that is seen. Clean the inside of the duct with a brush and clean up any left-over debris with a vacuum.
Keeping the exterior vent is equally as vital as the interior and most homeowners are banking on dryer vent cleaning in and around Markham as a way of making sure that the system is fully cleaned.
Step 8: Reattach The Vent and Turn on The Dryer
Use clamps or tape to reconnect the vent. Reattach the dryer and turn the gas on again (where appropriate).
Step 9: Start An Empty Cycle
Return the dryer to the initial position and do a cycle with no clothes at a time, 10-15 minutes. This assists in getting any dust or debris left in the system cleared away.