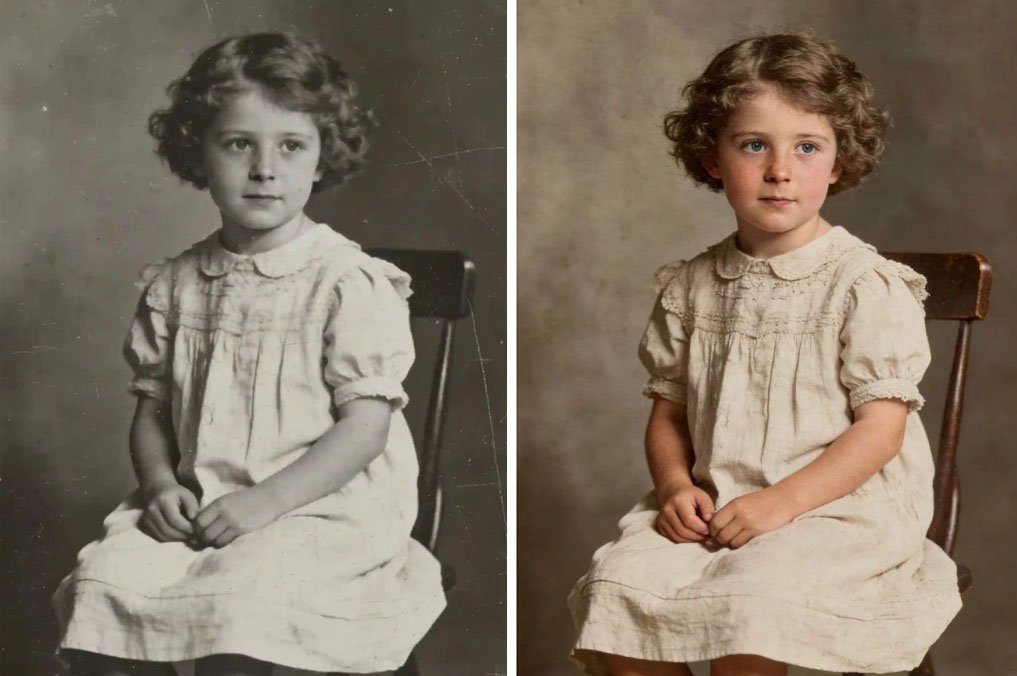
You probably have a box of old photos tucked away in a closet or an attic. These pictures often show the history of your family, but time is not kind to paper. You might see cracks, faded colors, or even mold spots on your favorite memories. In the past, you needed to pay a professional hundreds of dollars to fix these images by hand. Now, technology allows you to do this work from your own home with incredible results.
Restoring a photo is about more than just making it look new. It is about preserving a moment that might otherwise be lost forever. Modern software uses neural networks to look at the damage and figure out what should be there. It can fill in a missing corner of a house or rebuild the features of a face that has been smudged by water. You do not need to be a computer expert to make this happen.
The first step in your journey involves choosing a high quality AI Photo Enhancer to handle the heavy lifting. These tools are designed to recognize patterns in images and improve the overall clarity. When you upload a grainy or blurry scan, the software compares the pixels to millions of other images it has studied. It then adds detail where it is missing, which makes the final result look sharp and vibrant. You’ll notice a massive difference in how much emotion you can see in a person’s eyes once the blur is gone.
Before you start the enhancement process, you should look for any unwanted marks that might confuse the software. You can remove watermark from image files or get rid of old date stamps that clutter the composition. Cleaning up these distractions first helps the AI focus on the actual subject of the photo. If the software tries to enhance a stamp or a piece of tape, it might create weird shapes that do not belong in the picture. Starting with a clean digital file is the best way to get a professional result.
Step 1: Digitize Your Physical Prints
You cannot fix a physical photo until it is inside your computer. The quality of your scan will decide how good the final version looks. If you have a flatbed scanner, use it at a setting of at least 600 DPI. This stands for dots per inch, and a higher number means more detail for the AI to work with. If you do not have a scanner, you can use your smartphone camera.
When using a phone, place the photo on a flat surface near a window. Natural light is best, but you must avoid direct sunlight which causes glare. Hold your phone perfectly parallel to the photo so the edges do not look skewed. There are many apps that help you take flat photos without shadows. Once you have a clear digital file, save it as a TIFF or a high quality JPEG.
Step 2: Prepare the Digital File
Open your digital image and look for big problems. If the photo is rotated the wrong way, fix it now. If there are large black borders from the scanner, crop them out. You want the AI to spend all its energy on the actual image. If the photo is very dark, you might want to bump up the brightness slightly before you run the restoration. This gives the software a better view of the hidden details in the shadows.
Step 3: Run the Restoration Algorithm
Now you can upload your file to your chosen AI tool. Most modern platforms have a specific button for restoration or repair. When you click this, the AI starts a process called inpainting. It looks at a scratch and sees the colors on both sides of it. It then draws new pixels across the scratch to blend it perfectly. In 2026, this happens in just a few seconds. You’ll see the cracks disappear right before your eyes.
Step 4: Enhance Faces and Textures
Old photos often look soft or mushy. This is where the enhancement stage comes in. The AI will look at faces specifically. It knows where eyes, noses, and mouths should be. It will sharpen these areas to make the person look like they are standing right in front of you. Be careful not to turn the settings up too high. You want the person to look like themselves, not like a plastic doll.
Step 5: Colorize and Balance
If your photo is black and white, you can choose to add color. The AI is very smart at guessing what colors were there. It can tell the difference between a grass lawn and a brick wall. It will apply a layer of color that brings the scene to life. After the color is added, you can adjust the warmth or coolness. Sometimes the AI makes things a bit too vibrant, so you might want to turn the saturation down for a more realistic look.
Comparison of Restoration Methods
|
Method |
Best For |
Time Required |
| Manual Editing | Small touch ups | Hours |
| AI Restoration | Heavy damage and blur | Seconds |
| Professional Service | Very fragile originals | Weeks |
| Mobile Apps | Quick social media posts | Minutes |
Tips and Best Practices
To get the best results, you should always keep your original scan safe. Never overwrite the original file. Work on a copy so that if you make a mistake, you can start over. AI is powerful, but it is not perfect. Sometimes it might misinterpret a shadow as a stain. If you keep the original, you can always go back and try a different setting.
Another great tip is to work in stages. Do not try to fix everything at once. Fix the scratches first, then work on the blur, and finally handle the color. This prevents the software from getting overwhelmed by too many tasks. You’ll find that the final image looks much cleaner when you take it one step at a time.
Check the background of your photos as well. Sometimes we focus so much on the people that we forget the trees or buildings behind them. AI tools often have a feature to enhance the entire frame. This ensures that the whole photo looks like it was taken with a modern camera. It creates a sense of depth that makes the memory feel more real.
Common Mistakes to Avoid
One of the biggest mistakes people make is over-processing the image. It is tempting to remove every single bit of grain and make the photo look perfectly smooth. However, old photos are supposed to have some texture. If you remove all the grain, the skin can look like it is made of wax. You want to keep some of that vintage feel while removing the actual damage.
Another mistake is using low resolution scans. If you start with a tiny, blurry file, the AI has to guess too much. This leads to strange artifacts or faces that look like someone else. Always provide the highest quality file you can. It is much easier for the computer to work with real data than to invent new data from scratch.
Do not ignore the edges of the photo. Often, the most damage happens at the corners where people held the picture. Make sure your AI tool is covering the entire canvas. If the corners stay blurry while the center is sharp, the photo will look unfinished. Take the time to inspect the entire image at high zoom before you save your final version.
Summary of the Process
Restoring photos in 2026 is a blend of old memories and new logic. By following a simple workflow, you can save your family history from fading away. Start with a great scan, use the right tools to clean up the file, and let the AI handle the complex repairs.
The goal is to honor the original moment. You are not trying to create a fake image, but rather to reveal what was already there. With a little patience and the right software, those old prints in the attic can become beautiful digital files that you can share with your family for generations to come. Don’t let your history disappear when the solution is right at your fingertips.